Development
Research
Apr 15, 2025
20 min read
summary
Forms are a crucial part of web applications, allowing users to input data and interact with a website. In React, forms can be built using the HTML <form> tag and can consist of various input types, such as text fields, checkboxes, radio buttons, and dropdown menus. When building forms with React, it’s essential to consider both development and user experience perspectives.
Prerequisites
- 🔗 React Context
- 🔗 react-hook-form
- 🔗 Zod
- 🔗 Tanstack Query (or any other asynchronous data management tool)
I first started rethinking how to build forms after working on a few that had multiple steps, complex logic, and conditional branching. When you’re building simple, single-step forms, you can ignore a lot of the logic and state management. But with multi-step forms, it’s a whole different story.
Introduction to React Forms
React provides several features and techniques to manage form input effectively. One of the key techniques is using an event handler, such as onChange, to update the component state based on user interactions. This ensures that the form input is validated and managed correctly, providing a seamless user experience.
When validation criteria are not met, an error message can be generated to guide users in correcting their input.
Forms are a crucial part of web applications, and managing input elements like dropdowns and checkboxes is essential. Using the correct input type, such as email or password, helps in validating the data and ensuring that the input elements reflect user interactions accurately.
Managing the input value is also critical, especially in controlled components where the form elements derive their value from the React state. This synchronization ensures that changes to the input value are immediately reflected in the state, which is vital for efficient form handling.
In React, forms can be built using the HTML <form> tag, but they are often managed within a react component. Controlled components maintain their state through the React component itself, ensuring that the interface is consistent with the user inputs. This approach is particularly useful for complex forms with multiple steps and conditional logic.
Understanding Forms in React
Forms are a crucial part of web applications, allowing users to input data and interact with a website. In React, forms can be built using the HTML <form> tag and can consist of various input types, such as text fields, checkboxes, radio buttons, and dropdown menus. When building forms with React, it’s essential to consider both development and user experience perspectives.
React provides several features and techniques for creating and managing forms, including state management, event handling, and form validation. Understanding how to work with forms in React is essential for building engaging and interactive web applications. By leveraging these features, developers can create forms that are not only functional but also provide a seamless user experience.
Types of forms and form elements possible
There are several types of forms we might implement:
- Single-step form:
- Only one page
- A few fields to fill
- No navigation
- No stepper needed
- Linear form:
- Completing each step leads to the next
- There’s always just one final step
- Usually 3-5 steps
- Typically 1-2 API requests
- A stepper is usually required
- Non-linear form:
- Completing each step triggers the calculation of the next
- Typically 5-7 steps or more
- Conditions and branching logic are involved
- API requests may be needed after each step
To create a controlled component, you need to set the value of the input field to a state variable and update that state variable with an onChange event handler. This ensures that the state updates and form validation checks occur in real-time as the user types into the input fields, highlighting the interactions between user input and the state management of form data. This approach provides more control over the form elements, making it easier to handle complex form logic and validation.
In contrast, uncontrolled components rely on the native functionalities of HTML and JavaScript to handle input values without storing them in state. This can be simpler to implement but offers less control over the form data.
Controlled Components and Inputs
In React, a controlled component is a component where form elements derive their value from a React state. When a component is controlled, the value of form elements is stored in a state, and any changes made to the value are immediately reflected in the state.
To create a controlled component, you need to use the value prop to set the value of form elements and the onChange event to handle changes made to the value. The value prop sets the initial value of a form element, while the onChange event is triggered whenever the value of a form element changes.
Inside the onChange event, you need to update the state with the new value using a state update function. This ensures that the form element’s value is always in sync with the state. This approach provides a clear and predictable way to manage form inputs, making it easier to handle complex form logic and validation.
How can we implement multi-step forms with form data
The core feature of a multi-step form is… drum roll… multiple steps. To quickly implement a multi-step form, we can use event handlers like ‘onChange’ and ‘onSubmit’ to manage the state of form fields effectively. These event handlers are essential for updating the component’s state based on user interactions with the form elements.
Another useful tool is the react hook form library, which simplifies the form creation process in React. It offers features such as form validation and input handling, and following its recommended practices can help avoid conflicts and ensure smooth functionality.
Router-based steps
In this approach, each step is represented as a single route in the app. Navigating to the previous or next step is done by moving between the relevant routes. However, there are several challenges:
- We need to make additional code changes when adding new steps (the first and last steps are the easiest to add).
- We need to keep track of the steps and routes to navigate correctly (there’s no type safety and no internal route management).
- We can store form data in the search parameters (this is easier with route loader validation).
The advantage is that when using React Router or Tanstack Router, we have built-in route loaders. With client-side loading, we can validate the form data. If the current step has invalid data, the user will be redirected to the previous step. This approach allows us to keep validating the form using the built-in functionality, without needing extra render logic.
The main disadvantage is the complexity of managing stepper data. To create the stepper component using the router approach, we need to:
- Map route IDs to steps manually.
- The developer must define all the steps and the number of steps, as it will be hardcoded.
- Arrange these route IDs in the correct order based on the form sequence.
- Manually match the current route to the mapped routes to determine the step index.
Nested routes are simply additional routes, and we need to manually add them to the stepper route matcher. We expect the form to handle this on its own, but I’ll explain more about this possibility later.
Steps components array
This approach lets us set the steps within a single component or route. However, as I mentioned earlier, we have to write the step-change logic ourselves, while routers typically have a built-in mechanism for conditional rendering. To implement this, we need:
- A state for the current step index (for the stepper component).
- Navigation handlers will simply increment or decrement this index.
- A JSX array containing the step components.
The total number of steps is just the length of this array.
- It’s easy to add steps in the middle of the form; everything (stepper and renderer) adjusts automatically.
- Render the step components by their index.
We’ll also need to build a parser to remember the last valid step so that the form can resume from there when the page is reloaded. In most cases, this logic is ignored, causing the form to start from the beginning after a page reload.
If we have nested forms, we can use this approach too, but it will be harder to maintain. We won’t have direct access to nested step data without using complex contexts that add extra logic for managing state and computing the derived state for the stepper and navigation handlers.
Where should the final form request be?
Let’s take a theoretical (but very real for me) case and walk through it together step by step.
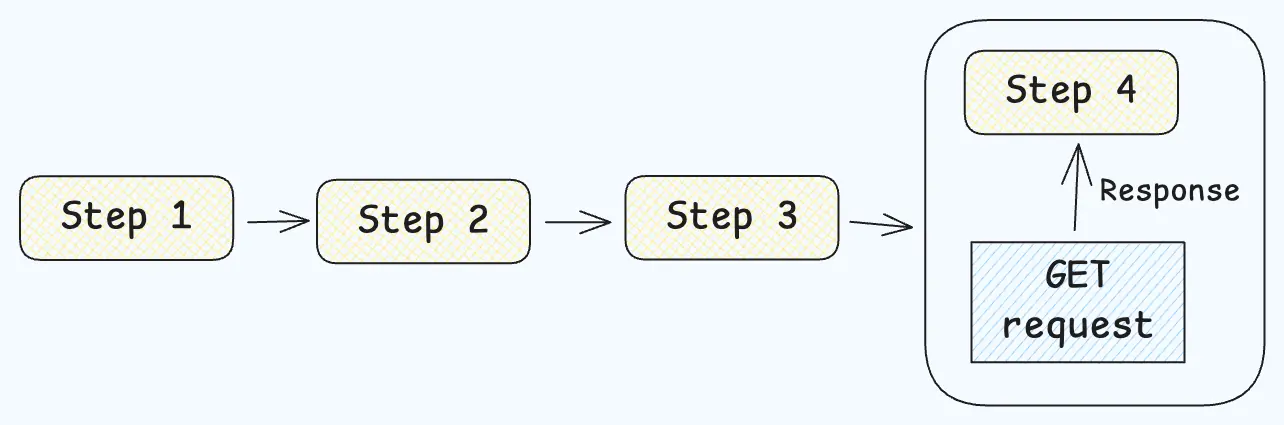
We have a 4-step form.
Each step contains several fields to fill in.
The last step shows a static message about whether the API submission was successful or not.
The form structure looks like this:

We already have a few important points to discuss:
- When should the API request happen?
– On the step where the response is displayed?
– Or right after the last step is completed? - Should we save the form data?
– If yes, where: localStorage, IndexedDB, or search params?
– What about files? - How should we validate the data?
- What should happen if the user refreshes the page in the middle of the form?
– Resume from the last completed step?
– Prevent refresh until confirmation?
– Start over and clear all data? - How do we handle errors?
- How do we show loading states?
- How do we manage the stepper state and form navigation?
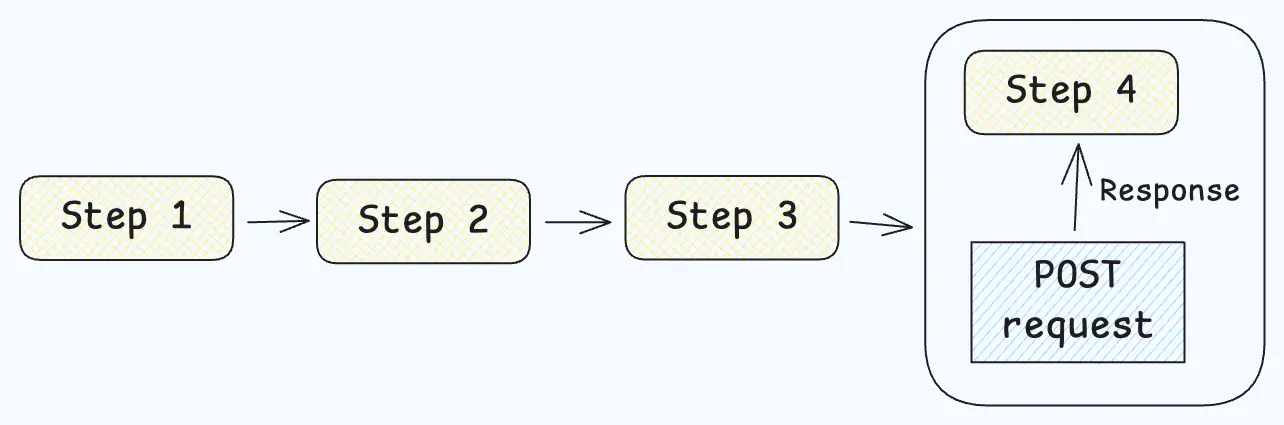
At first glance, it seems logical to send the API request and store the response on the last step — or on the step where the result is shown, or where other data depends on the response.
But there are a few “buts.”
TanStack Query provides two useful hooks:
- useQuery — for GET requests
- useMutation — for POST/PUT/PATCH/DELETE requests
useQuery runs the queryFn automatically on component mount (if enabled), even inside 🔗 <StrictMode />. So it works best for steps that display data — it will fetch the data as soon as the step is mounted.
useMutation, on the other hand, returns a mutate function, which gives us more control — we can call it manually on form submit, button click, etc.
So the question is: Which approach is better when building a multi-step form with async logic?
If you’re using useQuery, it makes sense to place the query inside the step where the data is shown — since it runs automatically when the step loads.
If you’re using useMutation, it’s better suited for actions like submitting the whole form after the last step, since you control exactly when the request happens.
// src/tanstackQuery/forms.ts
import { getIfUserIsQualified, type FormUserPayload } from '@/api/forms';

export const useGetIsUserQualified = (payload: FormUserPayload) => {
    return useQuery({
        queryKey: FORM_QUERY_KEYS.isUserQualified(payload),
        enabled: !!payload,
        queryFn({ signal }) {
            return getIfUserIsQualified(payload, { signal });
        },
    });
}
// ===
// src/modules/Form/FormResponseStep/index.tsx
import { useGetIsUserQualified } from '@/tanstackQuery/forms';

const FormResponseStep: React.FC = () => {
    // Whatever API to get the form data (form context, persisted data, store, etc.)
    const formData = useFormData();
    const { data: isUserQualified, isFetching } = useGetIsUserQualified(formData);

    if (isFetching) {
        return <Loader />;
    }

    return (
        <>
            {isUserQualified ? 'User is qualified' : 'User is not qualified'}
        </>
    );
};
On the other hand, we have a slightly tricky situation when it comes to mutations. There are two main options:
- ❌ Call the mutation inside the step that displays the response, using useEffect
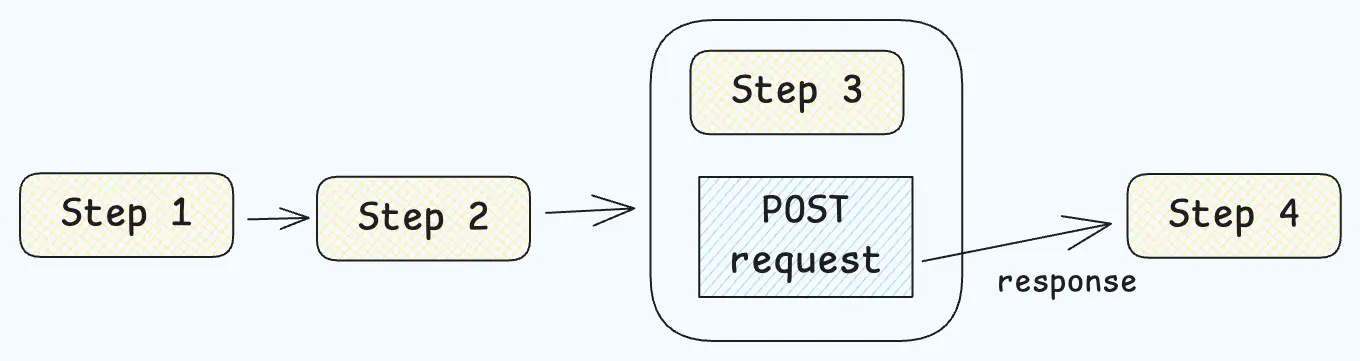
- ✅ Trigger the mutation on the step where all data is collected (usually the second-to-last step), using a mutationKey
Now, about the first approach — there’s a React-specific issue to keep in mind.
If you call the mutation inside a useEffect with an empty dependency array, it will run twice in development due to React Strict Mode. This can accidentally trigger double requests, which is definitely not what we want.
//src/tanstackQuery/forms.ts
import { submitForm } from '@/api/forms';

export const useSubmitForm = () => {
    return useMutation({
        mutationFn: submitForm,
    });
}

// ===
// src/modules/Form/FormResponseStep/index.tsx;
import { useSubmitForm } from '@/tanstackQuery/forms';

const FormResponseStep: React.FC = () => {
    // Whatever API to get the form data (form context, persisted data, store, etc.)
    const formData = useFormData();
    const { mutate: submitForm, isPending } = useSubmitForm();

    // Will cause twice rendering and the form will be submitted twice in terms of API
    React.useEffect(() => {
        submitForm(formData);
    }, [formData])

    if (isPending) {
        return <Loader />;
    }

    return (
        {isUserQualified ? 'User is qualified' : 'User is not qualified'}
    )
}
This approach will trigger at least two API requests because of the useEffect hook. Since formData is an object, any change in it on the current step can cause a new request.
And even if you think that using an AbortController might help — remember, this doesn’t work well with POST, PUT, PATCH, or DELETE requests. Once the data is sent to the server, we can’t stop it from being processed. AbortControlleronly works reliably with GET requests, where we are the ones receiving the data.
Also, if formData isn’t memoized, it may cause infinite re-renders due to incorrect data detection.
Now, regarding the mutationKey — using it on the pre-last step is a better solution. It ensures the request runs only once, and we can access the mutation response anywhere in the form using that key.
// src/tanstackQuery/forms.ts
import { submitForm } from '@/api/forms';

export const useSubmitForm = () => {
    return useMutation({
        mutationKey: FORM_MUTATION_KEYS.submitForm,
        mutationFn: submitForm,
    });
}

// ===
// src/modules/Form/FormSubmitStep/index.tsx;
import { useSubmitForm } from '@/tanstackQuery/forms';

const FormSubmitStep: React.FC = () => {
    const navigate = useNavigate();

    // Whatever API to get the form data (form context, persisted data, store, etc.)
    const formData = useFormData();
    const form = useFormSubmitStepForm();

    const { mutate: submitForm, isPending } = useSubmitForm();

    const submitHandler = form.handleSubmit(data => {
        submitForm({
            ...data,
            ...formData,
        }, {
            onSettled() {
                // This example works on "Router-based" form approach
                navigate({
                    to: '/form/result'
                })
            }
        });
    });

    return (
        <form
            onSubmit={submitHandler}
            {...}
        >
            {...}
            <footer>
                <button disabled={isPending} type="submit">Submit</button>
            </footer>
        </form>
    )
}

// ===
// src/modules/Form/FormResponseStep/index.tsx;
import { FORM_MUTATION_KEYS } from '@/tanstackQuery/forms';

const FormResponseStep: React.FC = () => {
    // Whatever API to get the form data (form context, persisted data, store, etc.)
    const formData = useFormData();

    const [isUserQualified] = useMutationState({
        filters: FORM_MUTATION_KEYS.submitForm,
        select(mutation) {
            if (mutation.isError) {
                return false;
            }

            return mutation.state.isUserQualified;
        }
    });

    return (
        <div>{isUserQualified ? 'User is qualified' : 'User is not qualified'}</div>
    );
}
Should we persist the data?
This question often gets an immediate answer, but then a QA engineer may ask:
“Hi! I reloaded the page and noticed the form is empty, even though I filled out the first step. What’s wrong?”
TL;DR: The answer is simple: Yes, we have to persist the data.
There are many situations where the user might be interrupted while filling out the form, and they expect to pick up where they left off:
- Page reload
- Unexpected tab closure
- And more…
One important rule for data persistence is: If the user goes back to a previous step after submitting it, that data should be saved too.
Sometimes, users may fill out a step but then realize they need to make changes on previous steps. If they go back to update the previous steps and continue from the last step, all the data should remain intact.
How to validate data?
First, we need to understand that validation applies to each step individually. The global form state simply stores the data submitted from each step, but it doesn’t validate it locally or globally. Validation is the responsibility of the step the user is filling out at the moment, and it should only happen when the user submits the step. After that, we use form methods to update the global state.
So, there’s nothing special to handle with multi-step forms in terms of validation.
Summary:
- Each step is a mini-form with its own validation schema.
- Validation happens only at the step level.
- The global state is updated only after the step is successfully validated.
How to handle loading states?
Loading states are an important part of any form.
We may experience delays in displaying up-to-date data when:
- A request is made on step mount to fill fields.
- The form determines the last valid step to navigate to.
- The form retrieves the last valid step data from the persistence layer.
These cases will be covered in the next sections, where I will demonstrate how to manage the form’s inner state.
How to manage the form’s inner state?
When creating a form, one of the key decisions is how to manage its inner state. Let’s start by defining what the form’s inner state is.
What is the form’s inner state?
- The form’s inner state refers to data that is used only within the form itself and is not shared outside of it.
- This state is used to display the current step, navigate between steps, and manage stepper information.
At a minimum, the form’s inner state should include the following data:
- Current step ID:
Why not use the step index? The short answer is “steps grouping.” The index will be used for internal calculations, but the public API will use the step ID. - Steps map
- Next/previous step handlers
- Last valid step ID (needed for page refresh scenarios)
- Indicator if the form can move to the next/previous step
- Indicator if the form is loading (e.g., initial data from localStorage or API requests)
- Indicator if it is the last step
How to create the “steps map”?
Let’s define the “steps map.”
The steps map is an object where the key is the step ID, and the value contains:
- Step ID
- Step label
- Step validation schema (optional when parsing the map from form wrapper children)
- Step initial data
There are two ways to create the steps map:
- Manual method
- Parsing from form wrapper children (currently TBD)
How to manage stepper data?
As mentioned earlier, stepper data is based on the form’s steps map. This map defines the order of the steps and their presence in the flow.
To manage this, we need a UI component that takes the form’s inner state and displays the progress of the form.
Here’s the data structure to send to the stepper component:
- Current step ID
- Steps array
(This can be a grouped array, which will be explained later.)
Why not just use “stepsAmount” and “currentStepIndex” to determine the current step?
This approach breaks when we start using grouped steps. In that case, we need a new parameter: activeGroupIndex. This adds complexity because both the step index and group index must be calculated outside the stepper component.
However, we want to keep this logic inside the component, so we can handle grouped steps more easily. The stepper component should manage the calculation of both step and group indexes automatically, without needing external logic. The form’s inner state should not control the group index—this is the stepper component’s job.
Let’s assume we don’t know if we will have grouped steps, and the form is just linear.
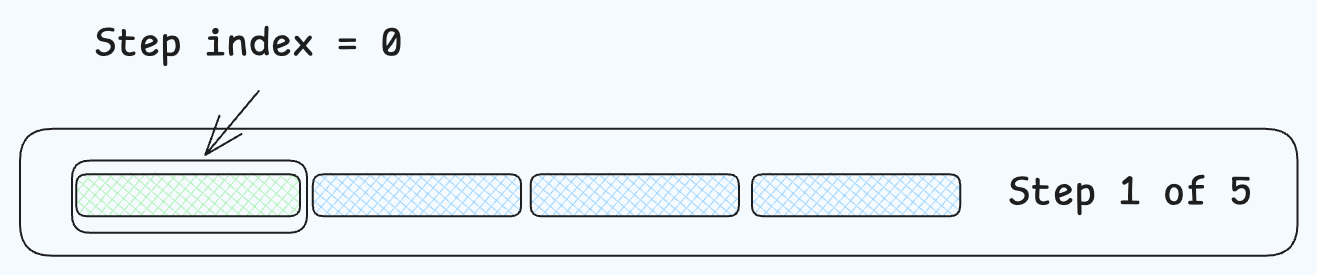
To display the required UI response, the component needs to calculate:
- The total number of steps.
- The current step index based on the steps array.
const totalSteps = steps.length;
                            // ^ string[]

const currentStepIndex = steps.findIndex((step) => {
    return step === currentStep;
});
The step indicator JSX will look like this to display whether the step indicator is active or not, based on the active step index that was just calculated:
<span
    key={step}
    className={s.step}
    data-state={stepIndex <= currentStepIndex ? 'active' : 'inactive'}
/>
That’s it, basically, for a linear form. Now, let’s move on to grouped steps. This is a pattern that clients really like and want, where forms are divided into grouped blocks.
The stepper is the first component that needs to be updated to support this feature.
What about grouped steps?
First things first, we need to change the data structure we provide to the stepper component.
Now, the steps array should include:
- Step ID
- Sub-steps array (just a string array, because we should never have multiple levels of grouping inside the form. If you have more than one level of nesting, something is wrong, and it makes sense to either break down those groups into separate steps or combine them into slightly larger step forms).
export type StepGroup = {
id: string;
subSteps?: string[];
// Additional data may be required for the stepper component (like displaying the current step label instead of just a counter)
[key: string]: unknown;
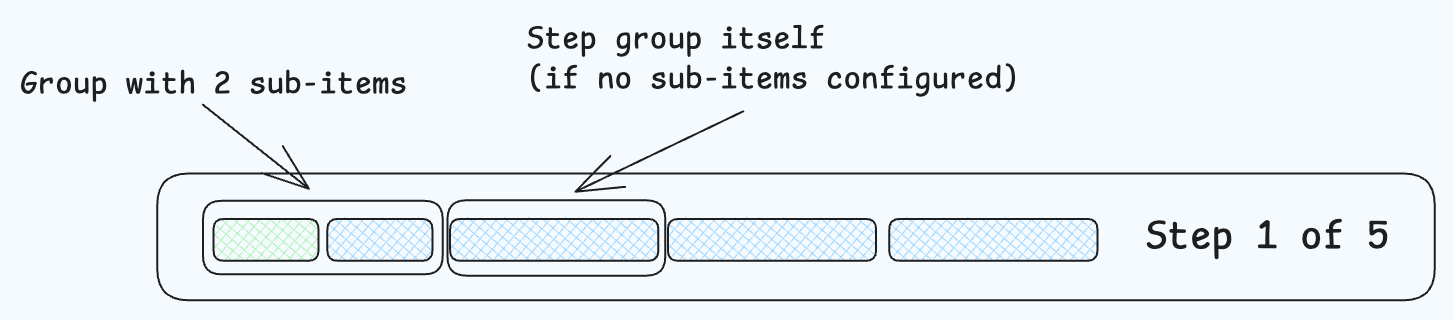
};The next feature we need to implement is determining the group index and step index. Here are some key points to consider during this process:
- If there are no sub-steps, the step is treated as a root group item with one root step.
- If the group is completed, all the group steps should be marked as completed. This is possible when: – The active global group index is greater than or equal to the group index.
To determine the group index and new step index, we should flatten the steps array.
const flatSteps = React.useMemo(() => {
    return steps.flatMap((step) => {
        if (!step?.subSteps?.length) {
            // Assuming that if there are no sub steps, the step is read as a root group item with one root step item at a same time
            return [step.id];
        }

        return step.subSteps;
    });
}, [steps]);
Getting the total steps count and the current step index to display the label or counter is the same process.
const totalSteps = flatSteps.length;
const currentStepIndex = flatSteps.findIndex((step) => {
return step === currentStep;
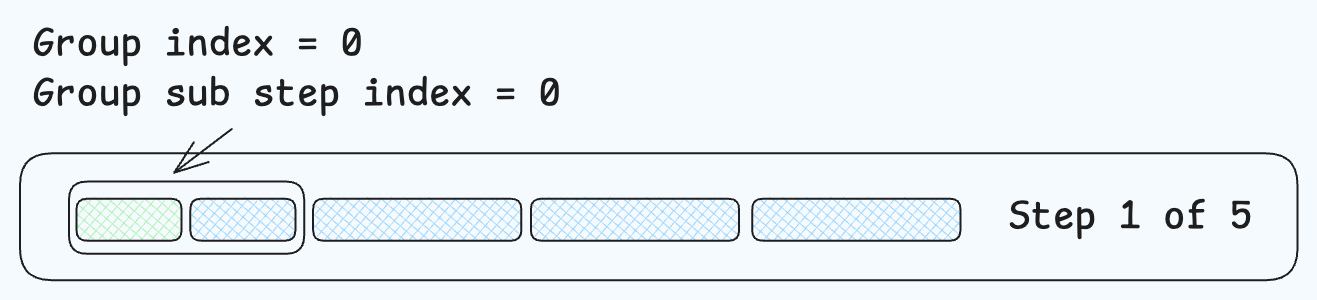
});Here, we need to determine the values that help show the UI indicators for the active group and step. We also need to consider that the current step could be inside a group. So, the current values are determined as follows:
- groupActiveIndex: The global root step index (a step without substeps is considered a group item).
- subStepActiveIndex: The index of the substep within the group (if the group has substeps).
const groupActiveIndex = steps.findIndex((step) => {
if (!step.subSteps?.length) {
return step.id === currentStep;
}
return step.subSteps.includes(currentStep);
});
const subStepActiveIndex =
steps[groupActiveIndex]?.subSteps?.findIndex((subStep) => {
return subStep === currentStep;
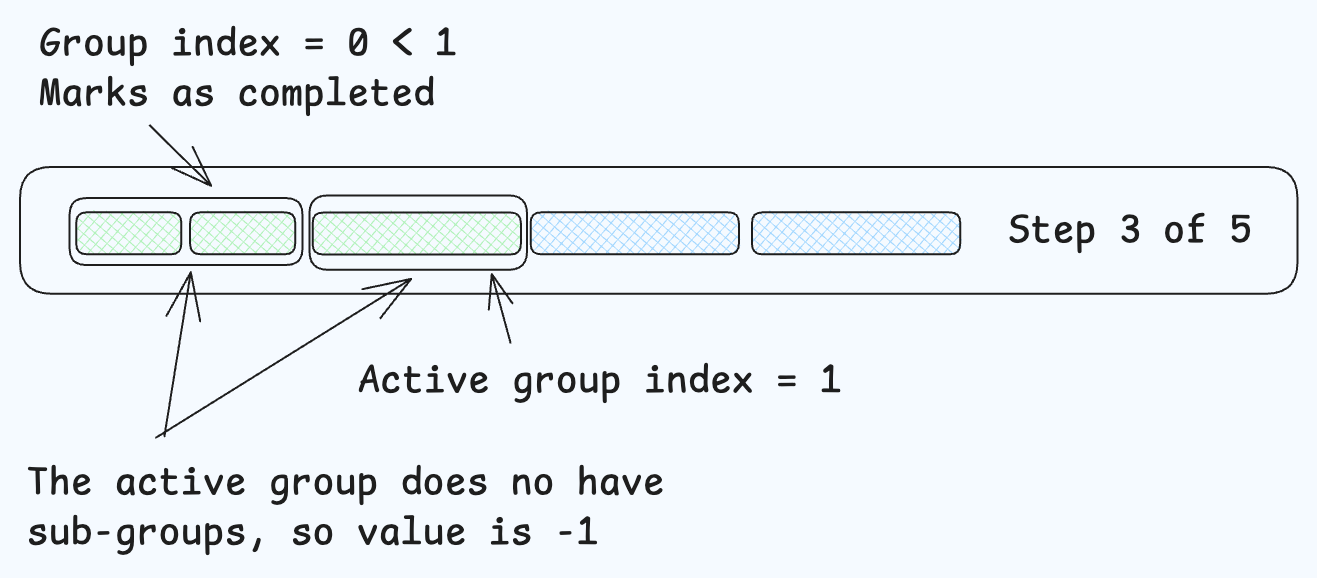
}) ?? -1;The last thing we need to do is update the JSX to display the groups properly.
<!-- Not grouped step -->
 if (!step?.subSteps?.length) {
    return (
        <span
            key={step.id}
            className={s.step}
            data-state={stepIndex <= groupActiveIndex ? 'active' : 'inactive'}
        />
    );
}

<!-- Grouped step -->
return (
    <div className={s.group} key={step.id}>
        {step.subSteps.map((_, subStepIndex) => {
            const isAllGroupCompleted = stepIndex < groupActiveIndex;
            const isSubStepActive = !isAllGroupCompleted && subStepIndex <= subStepActiveIndex;


            return (
                <span

                    key={`${step.id}-${subStepIndex}`}
                    className={s.step}
                    data-state={isAllGroupCompleted || isSubStepActive ? 'active' : 'inactive'}
                >
                    <span className={s.indicator} />
                </span>
            );
        })}
    </div>
);
Form Validation and Error Handling
Form validation is the process of checking user input data to ensure that it meets specific criteria or requirements before it is submitted to a server or used in some other way. In React, form validation can be achieved using built-in HTML validation attributes, such as required, minlength, and maxlength, as well as using React to perform custom validation logic.
When using React Hook Form, you can use the errors object to display validation errors to the user. The errors object contains the validation constraints for each field and can be used to display error messages to the user.
To handle form submission and validation errors, you can use the handleSubmit function provided by React Hook Form. This function is called when the form is submitted and can be used to trigger the onSubmit function and log the form data to the console. By effectively managing validation and error handling, you can ensure that users are guided through the form process smoothly, reducing the likelihood of incorrect or incomplete submissions.
Bottom line
Finally, by applying all the rules and components discussed throughout this article, developers can create a highly flexible, maintainable, and scalable multi-step form system. The core idea is to centralize the logic, making the process of building and extending forms much simpler and more efficient.
Instead of manually writing complex logic for each step or group, the form automatically handles most of the internal state management, navigation, validation, and data persistence. This not only saves valuable development time but also ensures that the form behaves consistently across different use cases.
By organizing the steps, grouping them when necessary, and implementing a robust parser to handle the steps map, we’ve ensured that the form can scale easily and handle new requirements without significant changes to the codebase. Developers no longer have to worry about repetitive tasks like calculating step indexes or managing nested steps manually.
In this approach, the developer only needs to define the steps map, and the form will take care of the rest, ensuring a smooth and seamless user experience. This method reduces the chance for errors and greatly improves the maintainability of the form. The result is a powerful, user-friendly system that makes creating complex forms as simple as possible while maintaining flexibility for future improvements.
Share this opening with friends

Jul 25, 2025
9 min read
Learn strategic frameworks for securing stakeholder approval for FinTech redesigns. Address compliance, security, and ROI concerns effectively.

Jul 14, 2025
9 min read
Discover why software design patterns, decision frameworks, and content strategy matter more than UI. Learn to document invisible systems that enable scalable growth.
Have a project in mind?
Let's chat
Have a project to
discuss?
discuss?

Have a partnership in
mind?
mind?